
 |
| Life Designed |
I had meant to talk to her about it a while ago, but with everything else we had to focus on, the bar cart got sent to the back burner.
I thought about converting an old change table into a cart but hadn't found anything that would be suitable for her style.
She had mentioned before that she loves shelving made from pipes which I love. Like really really love.
 |
| The Brick House |
Here's my super rough sketch. Haha Don't judge! Drawing is not my forte.
 |
| Life Designed |
 |
| Life Designed |
My first trip (there were 4) I spent $75!
Dang... it might be cheaper to just buy a cart!
For shelving, I got a 1" x 12" x 72" pine board (to be stained) and got it cut in half- I actually had to go back and get 1" cut off each board because they were just a tad too long didn't sit nicely on the pipes.
The steel strapping was used to secure the pipes to the underside of the shelves:
 |
| Life Designed |
 |
| Life Designed |
I started from the top shelf- which was a mistake. It was not coming together nicely (hard to tell from this picture but everything was wonky) so disassembled and decided to start from scratch- this time from the bottom.
A few times I was ready to throw in the towel. It was just not happening.
But I realize us artsy folk are #1 stubborn and #2 a little bit crazy. We wouldn't get anywhere otherwise!
 |
| Life Designed |
That includes 4 trips to Home Depot, sanding/staining the shelves and spray painting the pipes. Not to mention all the measuring/remeasuring, assembling/disassembling, sketching/thinking involved.
You also have to be mindful of the order in which you start assembling all the parts. It's like a puzzle. If you're an eager beaver like me, this means you have to assemble and disassemble a few times in order to get it right.
I also measured and pre drilled holes for casters on the bottom shelf. I'll be adding them later- can't have the cart rolling away as I'm trying to build it!
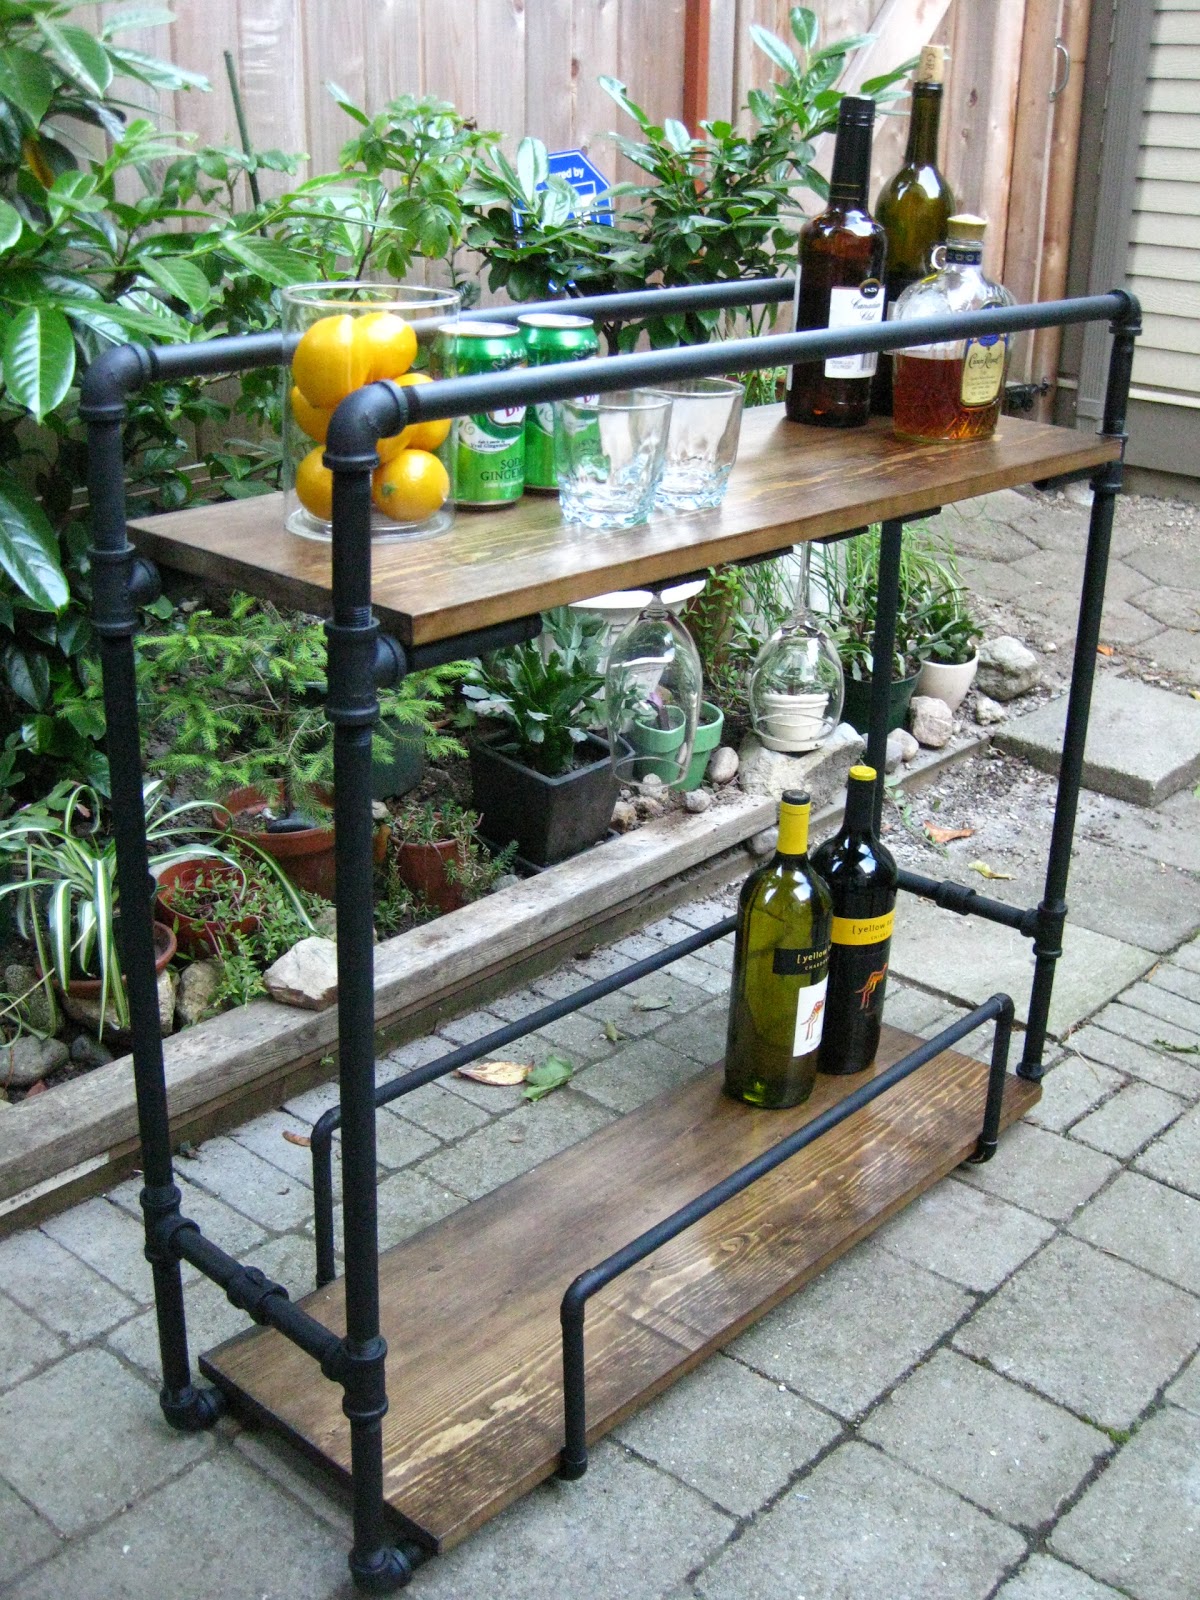
At this point, I was pretty happy with it! How industrial and rustic!
But as you can see, I neglected to account for a rail of some sort for the bottom shelf...
So the next day, I made my 4th trip to Home Depot and added this rail! You can't tell, but I cheated and used wooden dowels and lighter weight copper connectors because the cart was getting really really heavy.
I also got some wood- which I measured, cut and stained to make a glass rack:
I waited a little while and when the wood glue seemed dry enough, I decided against my better judgement to give it a test run. And...that's when this:
Became this:
Oops.
Undried glue: 1
Eager beaver: 0
I reapplied the glue and walked away. The next day:
No broken glass here! There's enough room to fit 6 glasses- I just grabbed what I could find in my house- minus the ones I broke. =(
I still have to put the casters on- I was just too eager to post this! Thankfully I already pre-drilled the holes so they should be easy to install.
I gotta say...I'm so so happy and really surprised I pulled it off!
Now it's time to gather all my receipts...
Total cost: $150.21
Perhaps a wee bit on the pricey end considering you can buy a bar cart for the same price, if not cheaper. But! I promise none will be as cool as this! At least that's what I keep telling myself. =)
This weekend I'm helping my sister and brother in law fix up their basement a little bit and maybe - maybe- attempting to make a little console table for my other sister.
What are your weekend plans?
I also got some wood- which I measured, cut and stained to make a glass rack:
 |
| Life Designed |
 |
| Life Designed |
 |
| Life Designed |
Undried glue: 1
Eager beaver: 0
I reapplied the glue and walked away. The next day:
 |
| Life Designed |
 |
| Life Designed |
I gotta say...I'm so so happy and really surprised I pulled it off!
Now it's time to gather all my receipts...
Total cost: $150.21
Perhaps a wee bit on the pricey end considering you can buy a bar cart for the same price, if not cheaper. But! I promise none will be as cool as this! At least that's what I keep telling myself. =)
This weekend I'm helping my sister and brother in law fix up their basement a little bit and maybe - maybe- attempting to make a little console table for my other sister.
What are your weekend plans?
Did you really make that? It looks AWESOME! Great work Nancy! :))
ReplyDeleteI did! I can't believe it myself! Haha Thanks Maria!!
DeleteWow you go girl andthank you for shareing. I will now try although can a 65 year old even keep up. we shall see
DeleteI love it. It gives me ideas for a work counter space next to my grill that I have been searching for a piece for! Nice work! Your newest follower :)
ReplyDeleteThis is awesome! Pinned for later, thanks so much for sharing!
ReplyDeletethat looks amazing!!! awesome job! love the rustic wood and industrial pipes!
ReplyDeleteHoly incredible! You did such a great job! I want one! Doubt I'd have the patience to build it though.
ReplyDeleteWOW I LOVE this! Totally looks like something you would buy from West Elm! I LOVE LOVE LOVE the pipe shelving picture also. You did an amazing job on the cart!
ReplyDeleteI saw this on apartmenttherapy.com-- absolutely beautiful!!
ReplyDeleteJust wanted to mention that it's actually well-priced. Ωt's difficult to find a decent bar cart for that price. Almost everything I've seen that isn't something of cheap materials (ie ikea/target/whatever) is more like $250+ easily and that's low end. Even second hand is hard to find bargains because bar carts are always a good sell. I'm sure there are some decent options out there for under $150, but I think they are few and far between and this is WAY nicer looking than most things you'd find at that price point. Nice job!
ReplyDeleteThanks so much for the assurance! =)
DeleteThis is sooo cool! Awesome job! Love that you made a glass shelf and everything :)
ReplyDeleteHey Nancy! Just found your blog today and I adore this project!!! I'm another BC blogger - nice to meet ya!
ReplyDeleteLove it!
ReplyDeleteAny plans on putting together a tutorial? I'd love to try it but I can't figure how the shelves are attached.
I used steel strapping to attach a pipe to the underside of the shelves. I ended up spray painting all the pipes and strapping black so you can't really see it in some of the photos. The 5th image down shows the strapping and the pipe! Hope that helps!
DeleteActually, I'd love a tutotiral as well. (i.e. materials used, different sizes purchased, color and type of spray paint used, etc. I'd like to build something like this for my girlfriend but I'm no design student/professional. Just someone who lives by DIY!
DeletePlease please please share!
I love the bar cart! Thanks for the instructions on how you made it. Pinned it! Saw you featured at Primitive & Proper.
ReplyDeleteThis turned out amazing! I've been looking for a bar cart for awhile, now I think I might try to make one. I hope it turns out as good as yours. Thanks for sharing! Wonderful project.
ReplyDeleteP.S. Thanks for also sharing the not so perfect things that happened when putting this together. Helps to know what to look out for. :)
Thanks Erica! I think you should and please let me know when you do. I'd love to see it!
DeleteThis is so original! Love it! I'm featuring this tonight at the link party. Thanks for linking up!!
ReplyDeleteKathryn
destinationcraft.blogspot.com
Lovely! You should sell that Bar cart here in France. It's great!
ReplyDeleteGreat job! I think this could work in my kitchen... How did you cut the steel strapping?
ReplyDeleteThanks Monica! Haha...I used a pair of gardening clippers that I found in the garage- probably not the best way to do it. As long as you can score it, all you need to do is bend it back and forth a few times and it snaps off. Or... just use steel cutters- much more efficient and you'll get a cleaner cut! Good luck!
DeleteWow, I love the idea!!! So cool!
ReplyDeleteWOW! SO COOL! We need one for outside! Thanks for sharing ! Saw this in Centsational girl. :-)
ReplyDeleteAhhhh.... I LOVE Centsational Girl! Thanks!
DeleteOMG I love it! I hope you post how you put the casters on! Your friend must love you for this lil gem. Awesome job!
ReplyDeleteThis is very impressive! This is the best bar cart I have ever seen! Hopped over from BOTB! Glad to find you site!
ReplyDeleteThis is soooooo cute! Thanks for sharing! The steel strapping is genius. Restoration Hardware has a plumbing pipe floating shelf that I was trying to figure out how to replicate. It appears to be floating on the pipe. This solves my problem beautifully. Lovely blog!
ReplyDelete- Julie
Thanks Julie! I just looked it up and yes you can totally replicate it! And for 1/16th of the price! =)
DeleteI also saw in Centsational girl and with a few modifications this idea is going to become my outside bar car next to my grill...thanks for the idea
ReplyDeleteAwesome! Good luck building!
DeleteCongratz on that! It looks great.
ReplyDeleteOut of curiosity, which color did you use for the paint of the pipes, is that a regular black?
Hi Michel! Yes, it's just regular black spray paint in a matte finish!
DeleteKnow what, the price tag isn't so bad considering it's a "one of a kind"!
ReplyDeleteGreat work! I have been wondering something about threaded pipe. If you are connecting them into a continuous square, do you need to buy one pipe which has it's threads reversed on a single side? If not and all the threads are going the same way, when you go to screw in the last end wouldn't it unscrew from one side while you are screwing in the other end? I hope this question makes sense.
ReplyDeleteGreat question! I wanted to reply to this publicly in case others have the same question. It does get tricky and you have to think about the sequence when you put these pipes together. There is an open end piece holding the shelf up so that part is easy because it's not a continuous square. But I had issues at the top! I was able to screw everything together but one piece is a little loose because of the threading issue. My cousin suggested using transparent glue to stick it in place. Mind you, it won't fall apart or anything but I just don't like how it's not tight like the other pieces. Hope that answers your question. Fire away if you have any others! Thanks!
DeleteThanks Nancy. I am planning a project to construct a chair from the same pipes. This article was very helpful. I might look into reverse threaded rods, and will let you know it is helps things out.
DeleteI didn't even know reverse thread pipes existed! I highly recommend using them over super glue! Ha ha. Yes, please let me know how it turns out. I would love to see it!
DeleteLove it! You should add a 'pin it' button! I saw your cart on Pinterest but it took some hunting to find the original post and your blog!
ReplyDeleteHow did you attach the decorative rail to the bottom shelf? I am making a similar shelf and am having problems attaching the rail and making it stable.
ReplyDeleteHi Laura, I used the same method I used for the shelves- see the 5th picture in this post. I screwed down steel strapping to the wood shelves to keep the 90 degree copper elbow in place. If you have any other questions, feel free to email me at alifedesigned@gmail.com. Good luck!
DeletePeople may paint or spray pipe glue onto a pipe, depending on the product and their needs. It is important to apply an even layer and to avoid making it too thin or too thick. The product should come with clear directions providing information about how much glue to apply and how long the joint needs to cure before water can be run through the pipes.
ReplyDeleteHi Nancy! This cart looks amazing! I'm planning to make it for my boyfriend's birthday, and was wondering if you would mind providing instructions on adding the casters. Thanks! Grace
ReplyDeleteHi Grace! The casters are really easy to add! I used basic casters from Home Depot which I just screwed to the bottom shelf. If you can afford it, I recommend getting vintage casters or something more industrial looking. If you have any more questions, feel free to email me! alifedesigned@gmail.com. Good luck with your project. I'm sure your boyfriend will love it!
DeleteYou’re a DIY angel, Nancy! I’ve been looking for cheap bar carts when I came across your blog, and this gave me a good idea on where to find them. It might be a bit pricey, but the final output looks like it costs more than $150. I’m looking forward to creating a project similar to this. It’s such a surprise to know what you can do with steel strapping and pipes!
ReplyDeleteThanks so much Thelma! =)
DeleteGood luck with your project!! I would love to see it when it's done!
I'm actually in the process of making this and desperately need to know: How in the world did you get the stickers off without taking off the black covering on the pipe? Everything I've spot-checked has resulted in the black coming off - half the reason I'm doing this is the black iron piping!
ReplyDeleteHm...I didn't have that problem because I bought the galvanized steel pipes and spray painted them a matte black. Good luck!
DeleteI completed chairs which are quite similar to your technique - take a look:
ReplyDeletehttp://thismarksthespot.com/post/41947242416/steel-pipe-cowhide-lounge-chairs-i-had-been
Awesome, I love the cowhide! And yes, good point about the left/right coupling. =)
DeleteLove the cart! My fiance & I are going to make it for our living room; I can't wait! Quick color questions: 1) what stain did you use on the wood?
ReplyDelete2) did you spray paint the pipes before assembling them? Did that affect the threading?
Thanks!
:-)
Thanks Lesley! I used Minwax's wood finish stain in dark walnut. Yes, spray paint before assembling and no it didn't affect the threading. Good luck and have fun!
Deletegreat design! You mentioned adding casters to the underside of the bottom shelf made the cart a little tipsy. What you could do is use 4 t-connectors on the bottom shelf the same way you did to hold up the top shelf. Then use 4 threaded stem casters and screw those into the t connectors. This would place the casters on the outside edges of the cart where most of the weight is. Problem solved!
ReplyDeleteAwesome job! Thanks for posting the instruction for making this cart! I appreciate sturdy furniture. It's nice to know that I'm not the only one that has to make multiple trips to Lowe's or Home Depot before the task is done!
ReplyDeleteThis is so cool! Awesome job! Love that you made a glass shelf and everything.competitive prices of beds and mattresses
ReplyDeleteThis is GORGEOUS! I love this style of furniture.
ReplyDeleteI found this while looking for a way to build an office cart to roll under my desk. This is far too large, but great inspiration! Thanks!
All work done good but black with chocolate is awesome,,?1.online beds for sale UK
ReplyDeleteNice post dear. I really enjoy to read it. cast iron casters & heavy duty steel casters
ReplyDeleteThe info you provided in the blog that was really unique I love it!!!
ReplyDeleteis bubblegum casting legitimate
Waooow!! Nice blog, this will be greatly helpful.
ReplyDeletebulbblegum casting
When I searched the blogs suddenly I saw this one and when I read it, amazing stuff out there that compelled me to comment.
ReplyDeletecheck out the post right here
The complete blogs are really inconceivable and definitely everyone will share this information.
ReplyDeletelook at here now
I’m definitely coming again to see these articles and blogs.
ReplyDeleteYOURURL.com
The gorgeous post learned a great deal Thanks greatly!
ReplyDeletecheck that
I read your blogs regularly. Your humoristic way is amusing, continue the good work!
ReplyDeleteread more
Outstanding blog, in my opinion site owners should acquire a great deal out of this blog its very user welcoming. check here
ReplyDeleteYou have to waste less time to search your obligatory matter on web, because these days the searching ways of search engines are nice. That's why I found this article at this point.
ReplyDeletewikipedia reference
I believe this is actually the most useful blog I've been through this entire day.
ReplyDeletebest credit repair services
Nice blog with awesome stuff!! Can you provide more information?? We are in fact waiting for you…
ReplyDeletehome alarm system
Wonderful collection of the posts!! These will be definitely helpful for everyone.
ReplyDeletelow fee payday loans
Nice stuff dear. Thanks for sharing it light duty casters & polyurethane wheels manufacturers & rubber wheel
ReplyDeleteCongratulations guys, quality information you have given!!!phlebotomy certificate program
ReplyDeleteHi Nancy, I wanted to let you know I featured your bar cart today on my blog post about DIY industrial pipe furniture, I just love this! It may be my favorite out of all the projects I featured. :) Have a great day! Sharon @ lilikoijoy.com
ReplyDeleteThumbs up guys you are really carrying out a great job.
ReplyDeleterental mobil jakarta
Having such type of incredible blogs provoking the people to come and visit this site and comment. Thanks for all
ReplyDeletePhilips Norelco 1160X
You entirely go with our expectation and the range of our information. Height Increasing Shoes
ReplyDeleteI think I have really come on the right place for getting the perfect info.
ReplyDeleteelectric razor
Well, I have got the best information from here the site is fully stuffed with the knowledgeable information.
ReplyDeleteTop Rated Electric Shavers
Totally unique stuff is here really amazing!!! best philips shaver review
ReplyDeleteGreat webpage buddy, I am going to notify this to all my friends and contacts as well. fruity cocktails with vodka
ReplyDeleteThis is really pretty cool place I like it because it has everything I want more on this blog soon. best vodka recipes
ReplyDeleteYour contents is really forcing out your readers to give the nice remarks.exercise routines
ReplyDeleteI think I have really come on the right place for getting the perfect info.
ReplyDeletebest home security system
I absolutely feel delighted once I realize articles appropriate to my work and my subject.sky blue credit repair
ReplyDeleteEvery week-end I used to pay a fast visit this site, because I’d like enjoyment, because this web site conations certainly fussy material.
ReplyDeletebest home security system
This blog post is really great; the standard stuff of the post is genuinely amazing. villas online
ReplyDeleteI suppose I've selected an unbelievable and interesting blog. best remington electric shavers
ReplyDeleteHow fine of you!!!! Really awesome efforts you have shown.Medical Negligence Solicitors
ReplyDeleteIt’s really such nice information to get advantage from. user guides
ReplyDeleteThe quality of your articles and listing is really attractive. garcinia cambogia extract
ReplyDeletethanks
ReplyDeleteGreat webpage buddy, I am going to notify this to all my friends and contacts as well. www.creditrepair.com reviews
ReplyDeleteYour blogs and its stuff are so notable and worthwhile it can make me return. royal dar al eiman Makkah
ReplyDeleteI'm dotty for your best article writings and contents auspiciously.
ReplyDeletebest credit repair companies
DSL Furniture offers a range of high quality, classic modern furniture designs, lighting and art work at affordable prices. Providing services to Hong Kong, Macau and offering distribution assistance globally.
ReplyDeleteDSL Furniture - Hong Kong Modern Home Furniture Furniture Hong Kong
best electric shaver
ReplyDeleteThe author of your blogs and articles and contents is really appreciating.
best electric razor 2014
ReplyDeleteGreat blogs buddy……… this will definitely assist me.
Cosmetic Dentist reseda
ReplyDeleteI don’t suppose many of websites give this kind of information.
How to lose stomach fat
ReplyDeleteSuperb posts with lots of information!!! This is really the most miraculous blog site dude….
payday loan companies
ReplyDeleteHi I was searching for the blogs for many times, now I have reached at the right place.
Is there a way get parts list measurements?
ReplyDeleteWhat size pipes did you use? I notice there are long and short ones. I love this and want to replicate it! (Or try to anyway!)
ReplyDeleteseo services
ReplyDeleteGreat blog post! I don’t understand how long it will require me to obtain through all of them!
pay day loan
ReplyDeleteNobody can reject the info you have given in the blogs, this is actually a great work.
teluate
ReplyDeleteI conclude I have selected the smart and inconceivable website along with interesting stuff.
Click to read more
ReplyDeleteThanks for your beyond belief blogs stuff.
The blog is good enough I again n again read this.
ReplyDeleteonline dating tips for men
It’s really very informative that I wanted ever, thanks for this. payday loans in ohio online
ReplyDeletefashion
ReplyDeleteYour blogs and each of its stuff is so pleasurable and valuable it is making me come back soon.
Hey enormous stuff or pleasant information you are offering here.
ReplyDeletelife style
easy online financing
ReplyDeleteI truly appreciate your working guys, thumbs up!!
Wow…….enormous blog. Thank you for sharing.
ReplyDeleteinexpensive whole life insurance
Thank you so much guys for giving such kind of information. This will assist me a lot.
ReplyDeletepayday loans online in oregon
Super-Duper blogs! I love it really!! Would come back to visit soon, again Thanks.
ReplyDeletepayday lones
Thanks for the entire information you have given here to impart knowledge amongst us?
ReplyDeleteblind date
I have actually saved your blog as a favorite; I truly love your provided information!
ReplyDeletecitation service
I didn’t have any experience about that, this blog has really built up my confidence.
ReplyDeletehome security system
Nice website full of quite interesting and informative posts, so must keep on good working!
ReplyDeleteWeb Design Company
congratulations guys, quality information you have given!!! best web 2.0 sites
ReplyDeleteWaow guys!! I am going to use this blog in my assignment work you have done the remarkable job really!!
ReplyDeleteelectric razor
I am greatly thankful to you for this exciting blog; I am cheerful because of your smart working really. Best Electric Shaver 2014
ReplyDeleteThat’s really extraordinary. I’ve not experienced whatever thing like that. home security systems reviews
ReplyDeleteI get contented to see this selective information. umrah visa
ReplyDeleteHi there to all, the post stuff present here is actually wonderful for people awareness, well, carry on the good work friends. best blog post
ReplyDeleteI am extremely keen of learning informative things, and this is the place which has fulfilled my requirements! highest deductible on car insurance
ReplyDeletehow do you get the pies to tighten on both ends don't you need a left hand thread on one end ?
ReplyDeleteI was searching for many blogs site and now finally I have got this cool place with lots of information.loan
ReplyDeleteI am actually delighted to read this post that carries countless of helpful information, thanks!! taruhan bola online
ReplyDeleteHi my friend! I wish to say that this post is amazing, nice written and include approximately all important infos. I would like to see more posts like this,
ReplyDeletemarmeren keukenwerkblad
Thanks a lot for one’s intriguing write-up. It’s actually exceptional. Searching ahead for this sort of revisions.
ReplyDeletehardsten keukenblad
Wow, thanks you have provided us a bunch of great selective information. Thanks personalcashadvance.com
ReplyDeleteYou fully match our expectation and the selection of our data.tennessee online payday advance
ReplyDeleteHmmm, as I am fond of getting the updates of latest technologies, so finally I have got this good website!!! Thanks best cheap life insurance
ReplyDeleteWonderful job in making the best blog ever, thanks for the good work. car insurane quote
ReplyDeletePlease, will you really post some more things about the same issue; I am actually a great fan of your blog... business credit builder
ReplyDeleteHi! Just wanted to say what a great project--so inspired! I'm going to tackle this over the weekend--surprise birthday DIY for my man :)
ReplyDeleteWould you be willing to share a final tally of the supplies you used? I'd like to get as close as I can to the "Ingredient List" as I can. And what was the final length (after trimming) of the two boards?
Any help/wisdom is much appreciated!! Can't wait to get this going!!
Thank you,
Vanessa Stanley
Where did you find the galvanized pipes? We couldn't find any at Home Depot.
ReplyDeleteKeep the balls rolling!! Nice posts you have given for us.Stargames
ReplyDeleteI really appreciate the work you have done here for attracting the visitors, and I hope you will be successful on one day! Health Insurance Tampa
ReplyDeleteIt sounds like fabulous!! I have been affectionate of your blog, I’ll come again to visit more posts. Health Insurance Miami Gardens
ReplyDeletewant to try this. can I get instructions/tutorials
ReplyDeleteValuable information. Thanks for sharing such a useful and informative post.
ReplyDeleteMaster Pipe
I admire the valuable information you offer in your articles. I will bookmark your site!!
ReplyDeleteTable Lamp Hong Kong
The specialized dampening movement minimizes effects of pulsation and vibration without liquid filling. Checkout this
ReplyDeleteGalvanized Steel Pipe
Really a wonderful flange, it easy for connecting pipes, valves, pumps and other equipment to form a piping system
ReplyDeleteWeld neck flange
Thank you for info
ReplyDeletepipa hdpe
Your idea is very good, can take advantage of the pipeline into other needs. thank you
ReplyDeleteCan be emulated, charming and helpful. thank you
ReplyDeleteReally Nice blog.
ReplyDeleteThanks for the detailed and useful information shared by you in your blog.
GALVANISED PIPES IN UAE
Welcome to JDE Installs! Readily serving the Sarasota, Bradenton, and TAMPA furniture building, we work in handyman organizations. From the most diminutive task to broad home change augments, we will likely outperform your yearnings as we change your home change reach out into something you can be satisfied with.
ReplyDeleteYou give a nice ideas.. I would like to share more information ...
ReplyDeleteHow I would like to search the Best Hair Dryer in India to use my hairs in home.
Are you going to buy a induction Cooker online from any online Shopping site from India, then top 10 rated reviews gives you guidance regarding the Induction Cooker. Choose the Best Induction Cooker for your Kitchen. Find the List of Best Induction Cooker in India.
Need help while choosing a Best Induction Cooker? Why are you wasting your time? There are plenty of Induction Cooker available in Market. Best Induction Cooker
Thank you for sharing your details of how you made the Pipe Bar cart :) I love the way you share in pictures every step of the way. Some people just share a few steps and the results.
ReplyDeleteSuch a great content ดูหนังออนไลน์ ฟรี
ReplyDeleteThis comment has been removed by the author.
ReplyDeletethanks for information share
ReplyDeletenice idea. thank you
ReplyDeletehublaagram ss
ReplyDeleteI’m extremely impressed with your writing skills as well as with the layout on your blog
Apental try
our new hublaagram apk
ss
I would use pallet wood for the shelving - great way to recycle.
ReplyDeleteHi, thank you for sharing the post it's really amazing it gives more ideas for decoration very useful blog please share this type of blogs frequently thank you. Good work!
ReplyDeleter404a refrigerant
Norton helpline number
ReplyDeleteMcAfee tech support phone number
Malwarebytes support
Hp printer support toll free number
Canon printer support usa
One of the finest Indian restaurants in Oxford is the TreeHotel restaurant, founded in 2004, it offers fine, affordable Indian cuisine and it offers Indian cuisine with finely blended spices and seasoning to tantalize your senses. It offers a huge variety of Hyderabadi and north Indian cuisine at its finest with each dish transporting you to the very shores of India as it tells its own delicious tales through the exotic flavours and colors.
ReplyDeletebest restaurants in oxford
Indian Restaurant in Oxford
www.lampungservice.com
ReplyDeletehttps://servicecentermito.blogspot.com/
https://www.crunchbase.com/organization/pt-lampung-service
https://youtubelampung.blogspot.com/
https://konsultanhp.wordpress.com/
https://komunitasyoutuberindonesia.wordpress.com
https://youtuberandroid.wordpress.com
https://youtuberterbaikindonesia.wordpress.comhttps://servicecenteraxioo.blogspot.com/
https://komunitasyoutuberindonesia.wordpress.com
ReplyDeletehttps://youtubertycoon.wordpress.com
https://youtuberterbaikindonesia.wordpress.com
https://www.crunchbase.com/organization/pt-lampung-service
https://www.linkedin.com/today/author/pt-lampung-service-9b950a145
https://kursusservicehpindonesia.blogspot.com
https://servicecenteradvan.blogspot.com/https://usahabisnisindonesia.wordpress.com
https://servicecentersharp.blogspot.com/
https://youtubelampung.blogspot.com/
Thanks for sharing such a nice Blog.I like it.
ReplyDeletemcafee activate product key
norton activate
Given article is very helpful and very useful for my admin, and pardon me permission to share articles here hopefully helped :
ReplyDeleteCara Mengobati Kaligata Secara Alami Dan Cepat
May be useful for all, helpful article once and pardon me permission to share also here :
ReplyDeleteCara Menyembuhkan Kista Payudara Secara Alami
Given article is very helpful and very useful for my admin, and pardon me permission to share articles here hopefully helped :
ReplyDeleteCara Mengatasi Perih Di Ulu Hati Secara Alami
canon Printer Tech Support Number
ReplyDeletecanon Printer Tech Support Phone Number
canon Printer Support Number
canon Printer Support
canon pixma mx490 wireless setup
canon mx328 pixma printer error code u163
Nice blog....
ReplyDeleteWe are helping HP Products support help.
HP Technical Support Number
HP Customer Support Number
HP Support Assistant
ReplyDeleteIf you are looking for HP Printer Support Phone Number 1-855-499-1999. Then this is the best direct number to the HP printer customer services team. We have sourced this number to save your time searching over the internet for the HP Customer Support Phone Number.
HP Printer Support Number
All the representatives have several years at Dell Printer Support Phone Number has the expertise of years in this field thereby providing the best services. We are available 24X7 to give out support to our users. Our team of experts will provide the ideal answer to all your issues.
ReplyDeleteDell printer toll free number | Dell printer technical support
Canon Printer Support Number
ReplyDeleteCanon is one of the leading brand names in the world of electronics and computers. Hewlett Packard commonly known as Canon, it is the American multinational IT company which provides a wide range of electronic products and computer related equipment across the globe ranging from laptops, desktops, notebooks, printers, and many others to fulfill the requirements of small, medium and large-sized organizations. Due to its amazing features and excellent
Canon Printer Tech Support Number
, it is one of the most demanded brands around the world. Apart from this, Canon products are well known for their excellent performance, super functionality, accessibility, and lots of other reasons. Get best suggestions regarding Canon Printers from the support executives by dialing the
Canon Printer Customer Service Number
.
When you talk about printer there are lot many brands comes in your mind but HP is the one brand that actually stood out in the market. With the
ReplyDeletehelp of HP Printer Support Phone Number which is available by 24*7 you can get best solution for your printers. Our main motive is to create a long
chain satisfied customers and provide you the best possible solution through the toll-free HP Printer Tech Support Phone Number +1 (855)-924-8222.
HP Printer Technical Support Number
ReplyDeleteMicrosoft office setup is the product setup record with this setup document you can introduce on your PC and a portion of the bolstered gadget to utilize Microsoft office
If you need office setup with product key go to Office/Setup
Get all the features of Norton Security and more in NEW Norton 360. Or try NEW Norton 360 with LifeLock that combines device security, online privacy. download Norton antivirus with all new feature norton.com/setup and Protect Your Computer From Viruses & Malware
ReplyDeleteThis comment has been removed by the author.
ReplyDeleteThis comment has been removed by the author.
ReplyDeletehttps://69beautiful.blogspot.com/2018/04/bikini-model-escorts-in-delhi.html?showComment=1565089620513#c4669266702473247136
ReplyDeletedigiwit
ReplyDeleteطراحی سایت
سئو
The best way that you can attain our support and services is by connecting with us. We are more of a talented specialists who understand how to eradicate issues without any concern or hitch. Our Dell customer service engineers are available to remove all problems in minimum time. So connect with us for help as per your need and demand.
ReplyDeleteDell Support Phone Number
Dell Customer Service
This comment has been removed by the author.
ReplyDeleteThis comment has been removed by the author.
ReplyDeleteideas and applications of the work are good, the design is also good and can be replicated. Thank you for sharing ideas
ReplyDeleteHi, I must say it was a great article!
ReplyDeletecanon printer error code 6000 is a very common error which is found among Canon printers. While printing, it may arise at any moment. When this message appears on your LCD, it comes along with a message which indicates to turn off your printer suddenly. As soon as you power off the printer, you will find that the light green-orange flashes with an interval in between. It is originally a paper jam issue.
If you face any problem to solve then do visit us: canon printer error code 6000
Hi, I must say it was a great article!
ReplyDeletecanon printer error code 6000 is a very common error which is found among Canon printers. While printing, it may arise at any moment. When this message appears on your LCD, it comes along with a message which indicates to turn off your printer suddenly. As soon as you power off the printer, you will find that the light green-orange flashes with an interval in between. It is originally a paper jam issue.
If you face any problem to solve then do visit us: canon printer error code 6000
ReplyDeleteHp Printer Support
Hp Printer Support Number
Hp Printer Assist
Hp Printer Assistant
Hp Printer Support Phone Number
Here we provide the services for office/setup and Hp Customer Service. you can download the setups of office by clicking below and if you have any issue regarding apple product if you need any feel free to call our toll free HP Customer Service +1-800-382-3046
ReplyDeletewww.office.com/setup | HP CUSTOMER SERVICE
The office.com/setup yet all the product forever has the arrangement document, and it is exceptionally critical, without the arrangement record the product turn ineffective.Sign in to enter office setup product key. Know how to benefit, download, install, set in movement, uninstall and reinstall MS office setup and Get Started by now Office setup.
ReplyDeletewww.office.com/setup | www.norton.com/setup
| www.office.com/setup
Why our online vape shop is without equal .buy top quality https://buydankvapeonline.com/product-category/dank-vapes/
ReplyDeletehttps://buydankvapeonline.com/product-category/brass-knuckles/ Vapes has been established by a team of avid vapers, which is why we know how to meet our customers’ specific needs. We take great pains to make our assortment as varied as possible. So that you can find all sought of devices and https://buydankvapeonline.com/product-category/stiizy/ supplies under one roof. You no longer have to stray through the mazes of the Internet to get vape carts online. We have all of these and even more at very cheap prices /https://buydankvapeonline.com/product-category/kingpen/
Are you wondering where to get vape supplies online that will make your vaping experience like no other? .Simply browse through our catalog and let buydankvapeonline's Vapes exceed your expectations. At our store, you can buy dank vapes online, https://buydankvapeonline.com/product-category/wholesale-carts/ buy kingpens online, buy wholesale carts online, buy brass knuckles online at a click. Simply search by the device type or brand and then add the product that fits the bill to your cart. We will deliver it to you in no time so that you can ehttps://buydankvapeonline.com/product-category/brass-knuckles/ /njoy your favorite clouds of vapor as soon as possible!buy kingpens online now
While some businesses may be hesitant about shifting to cloud, Office 365 does have several essential features and advantages. Workers are already adept at working on Office applications, by getting Office 365 and activating the setup ms office-setup your business not just gets the chance to utilize the safe efficiency programming which it has been utilizing for a considerable length of time, yet you can likewise give the obligation on tech giant Microsoft. for more detail visit to our website
ReplyDeletewww.office.com/setup |
www.norton.com/setup |
www.norton.com/setup
Satta king website in india's we provide satta gali
ReplyDeleteand upgameking result with disawar satta number we help in satta bazar and satta result fast.
Find Satta king Results Super fast all live results available here ,Gali desawar leak number available here, Satta king best site for Satta matka result.
Miramar Beach Goa, Find out detailed information about Miramar Beach Tour including travel tips, hotels near Miramar Beach, best time to visit & much more.
miramar beach
insidegoa
Hello, and welcome to our website for the best hand raised
ReplyDeletehand raised macaw parrots for sale. We pride ourselves in the best taming practices of macaws among aviaries. All of ourmacaws for sale are bred in a disease-free Biosecure breeding sanctuary. They are well socialized, having been raised in our home as members of our own family in order for them to become ready to be a member of yours, we have green wing macaw,severe macaw for sale,scarlet macaw for sale,blue and yellow macaw for sale among others. They are quite comfortable around all ages, including the elderly and young children. When you purchase a bird from Us, we are committed to offering lifetime support and guidance to you and your family.You can read more and view our available birds.You can
READ MORE and view our avilable birds.
Norton is a reputed and cost-effective antivirus suite company which offers protection so that no virus can damage your computer. It also provides many other products and services apart from antivirus.
ReplyDeletenorton.com/setup
Is it accurate to say that you are chasing for the best HP Printer Technical Support accessible crosswise over USA and Canada? We offer the best and solid specialized help for all issues identified with your HP items.
ReplyDeleteIn the event that you are truly tired of the re-happening printer issue with your claimed HP, at that point we prescribe you to attempt our World-class remote technical support which is only one summon. Call and get associated with our online HP remote technical support.
HP Printer Technical Support Phone Number
HP Printer Customer Support Phone Number
HP Printer Support Number
HP Printer Support Phone Number
HP Printer Support Toll-Free Number
HP Printer Support Helpline Number
HP Printer Tech Support Phone Number
ReplyDeleteEpson Printer Support Phone Number
Epson has turn out to be a leading and familiar identify because it affords the great and large range of hardware and software program merchandise to
the customers.The merchandise and services of Epson are very reliable, effective, lower priced and long-lasting due to the fact you can get the trendy
technological know-how trip and upgraded versions for your personal use. It has the satisfactory range of laptops, desktops, printers, drivers, tough
drives, pen drives, and many greater devices.All of them are reachable in market at very inexpensive expenditures and also Epson gives fantastic
classification purchaser carrier thru Epson Printer Support Phone Number. But in a situation, customers face a lot of problems with Epson products and
offerings and in such conditions, a purchaser can join with the experts.
epson Printer Support
epson Printer Support Number
epson Printer Toll Free Number
epson Printer Support Phone Number
epons printer customer support number
epson printer customer helpline number
epson printer customer care number
epson Printer Technical Support Number
epson Printer Technical Support Phone Number
epson Printer Technical Support
epson Printer Tech Support Number
epson Printer Tech Support
epson Printer Helpline Number
epson Printer Toll Free Number
epson Printer Contact Number
Let's Connect With Epson Printer
ReplyDeleteepson Printer Support
epson Printer Support Number
epson Printer Toll Free Number
epson Printer Support Phone Number
epons printer customer support number
epson printer customer helpline number
epson printer customer care number
epson Printer Technical Support Number
epson Printer Technical Support Phone Number
epson Printer Technical Support
epson Printer Tech Support Number
epson Printer Tech Support
epson Printer Helpline Number
epson Printer Toll Free Number
epson Printer Contact Number
Let's Connect With Epson Printer
Satta king website in india's we provide satta gali and upgameking result with disawar satta number we help in satta bazar and satta result fast.
ReplyDelete
ReplyDeleteepson Printer Support
epson Printer Support Number
epson Printer Support Phone Number
epons printer customer support number
epson printer customer care number
epson Printer Helpline Number
epson Printer Toll Free Number
epson Printer Contact Number
epson Printer Technical Support Number
epson Printer Technical Support Phone Number
epson Printer Technical Support
epson Printer Tech Support Number
epson Printer Tech Support
Epson Printer Error Code 0x9d
Let's Connect With Epson Printer